If you don’t have a CB radio yet please check out our buying guide page.
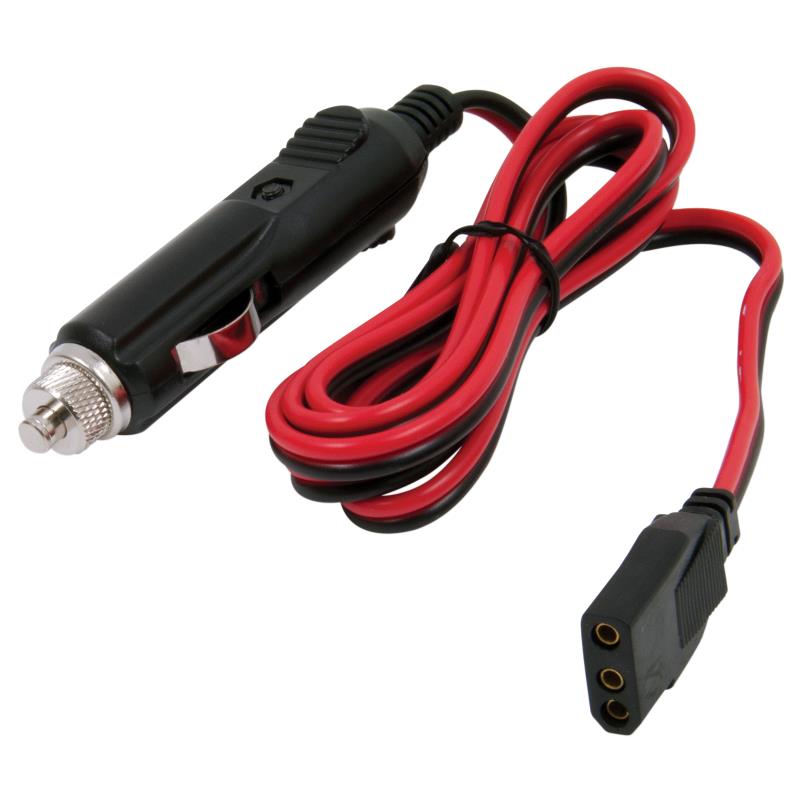
To get started with your CB radio you will need to hook the CB up to a power supply and an antenna via a length of coaxial cable (see our buying guide page for recommendations for these supplies). The simplest set-up (besides using a handheld CB with the supplied antenna — which limits your range to a couple blocks in the city, or around 0.5 to 1 mile in a flat rural area) is a mobile set-up in your vehicle. For a very easy mobile set-up you will simply power the CB radio via your cars cigarette lighter electrical outlet. To do this you will want to buy a 12 volt 3-pin cigarette lighter plug fused cord. Simply plug the 3 pin connector into the back of your CB radio, hook up / tune your antenna and you are ready to go!
We will cover the mobile set-up first. For information on a home or “base station” set-up scroll down to the base station set-up heading below.

12 volt 3-pin cigarette lighter plug fused cord
CONNECTING YOUR CB RADIO TO ANTENNA / SELECTING THE RIGHT TYPE OF COAXIAL CABLE
For most mobile set-ups you will use RG-58 (aka RG-58/U, if it meets Universal specifications) coaxial cable (coax) with PL-259 connectors for your CB. CB coax uses UHF connectors — aka PL-259 connectors; female UHF connectors (such as the one on the back of your radio) are also called SO-239 connectors. One end of the coax will plug into your antenna input on the back of your radio, and the other end will screw onto your antenna.

RG-58 coax with PL-259 connectors
Setting up your antenna in a mobile set-up can be pretty straight forward—especially if you use a simple magnet mount antenna with coax provided (such as those made by Firestik or Wilson). The most complicated part is checking your standing wave ratio (SWR) and tuning your antenna.
TUNING YOUR ANTENNA / CHECKING YOUR SWR
Every CB needs to have the standing wave ratio (SWR) checked — this measures the amount of RF signal being reflected back into the CB; too much and it will fry your radio. If you don’t have a built in one on your CB, you can pick up one pretty cheap online or probably at a Radio Shack or truck stop. Below we will explain how to check your SWR using an external SWR meter. (Note: if you are using your CB radio’s internal SWR meter the below info will still be helpful, you will just have to look at your radio’s instruction manual to see how to use the built-in SWR meter.)
- Switch your SWR meter to calibrate (or FWD on some models) mode and depress the transmit button on your microphone to get the needle to the “set” point on your SWR meter.
- Switch to SWR mode (or REF on some models) and key up on channel 1, and write down the reading. Then repeat this on channel 40.
- If your SWR is higher on channel 40 you need to shorten your antenna 1/16 to 1/8 inch at a time (be careful here because it only takes a little to make a difference!). If your SWR is higher on channel 1 you need to lengthen your antenna. (Remember this mnemonic: if your SWR is higher on 40 you need to make it shorty; if your SWR is higher on 1 then you need to lengthen it some.) With a dipole you want to shorten or lengthen equally on both sides. Ideally, you want an SWR of 1.5 or lower, and the same on channel 1 as on channel 40, though this will be difficult to achieve in the real world. Just shoot for the best you can do — see below about high SWRs. (Note: SWR is often expressed as over a 1, so sometimes you’ll see an SWR of 1.5 written as 1.5:1. An SWR of 1 or 1.0:1 means you are transmitting at full power, since none of the power is being reflected back into your radio.)
- Any SWR over 2.0 is considered poor, and over 2.5 is very poor (the danger zone). With an SWR in the 2.0 to 2.4 range you should be alright with occasional or light use of the transmitter, but transmitting with an SWR of 2.5 or higher could damage your radio if you transmit on it a lot. Obviously, the higher the SWR the worse it is on your radio to transmit. Remember, ideally you want your SWR to be 1.5 or lower. You should be able to listen just fine with a high SWR, but don’t transmit much until you’re able to fix it.
Below is a short video on how to do an SWR check and antenna tune in a quick and easy mobile set-up. See our buying guide if you do not have an antenna for your CB radio yet.
SETTING UP YOUR CB / ANTENNA IN A HOME — THE “BASE STATION” SET-UP
A home CB set-up is called a “base station”.
CHOOSING A POWER SUPPLY FOR A CB BASE STATION
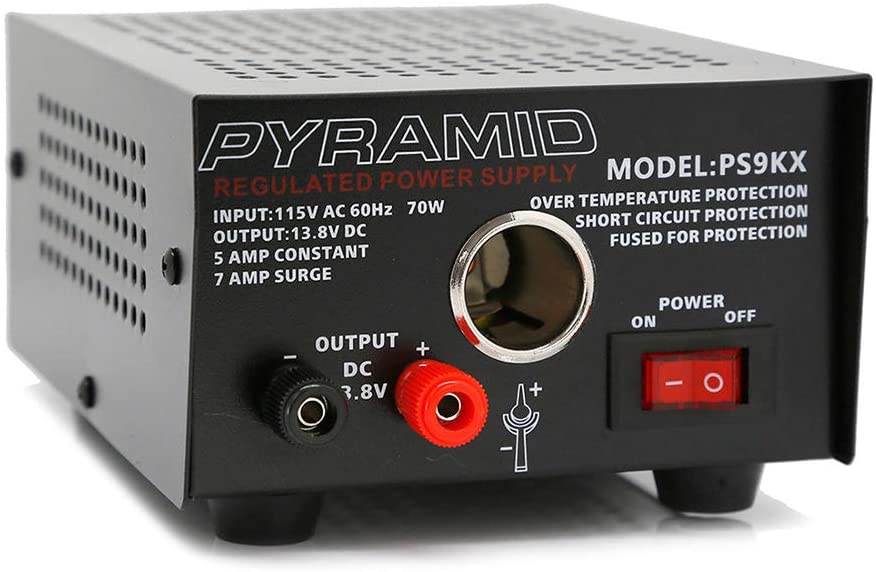
For a CB set up in your home (what is called a “base station” — as opposed to a mobile set-up) you will need to buy an AC (AC = alternating current — the type of electrical current in your home) to DC (DC = direct current — the kind of electrical current used in a vehicle or batteries) power supply that supplies 13.8 volts and at least 4 amps constant. The following product is highly recommended: Pyramid PS9KX Universal Compact Bench Power Supply-5 Amp Linear Regulated Converter w/ 13.8 Volt DC 115V AC 70 Watt Input, Screw Type Terminal, 12V Car Cigarette Lighter.

With this power supply you can use a 12 volt 3-pin cigarette lighter plug fused cord (see above) or a bare stranded 12 volt 3-pin fused cord.

Bare stranded 12 volt 3-pin fused cord
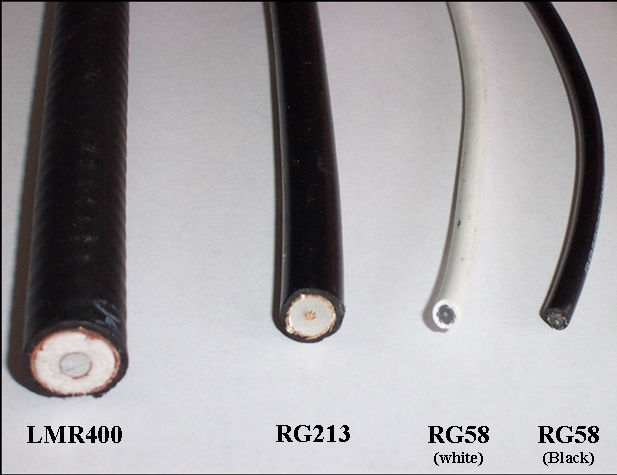
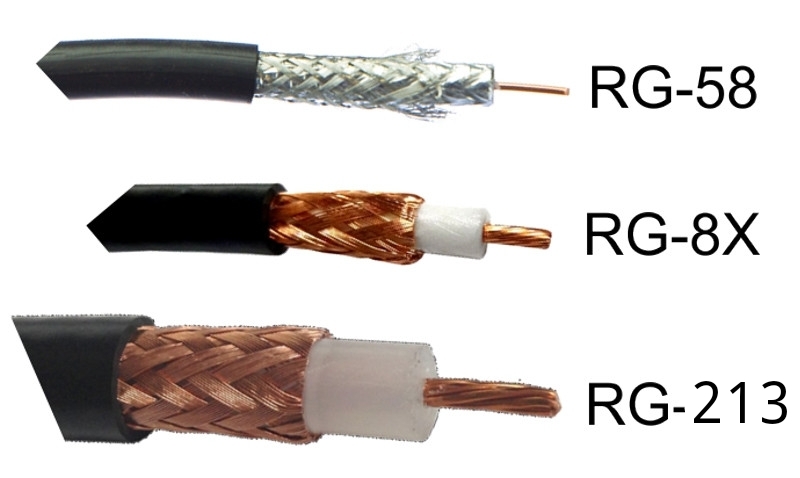
For a base station you will likely use longer lengths of coax than a typical mobile set-up, so you will need something with less line loss (signal strength lost through the cable) than the type of really flexible coax used for mobile set-ups. For a base station, then, you will want to run low-loss coax like RG-8X, RG-8U, RG-213, or, ideally, LMR-400 (also called KMR-400). CB coax uses UHF connectors — aka PL-259 connectors; female UHF connectors (such as the one on the back of your radio) are also called SO-239 connectors. One end of the coax will plug into your antenna input on the back of your radio, and the other end will screw onto your antenna.
RG-58 loses 2.5 dB per 100 feet
RG-8x loses 2 dB per 100 feet
RG-8U loses 1.1 dB per 100 feet
RG-213 loses 1.3 dB per 100 feeet
LMR-400 loses 0.7 dB per 100 feet
Below are some images to help you gauge the sizes of these types of coax (RG-8U is not pictured, but it is similar in gauge or thickness to RG-213). * Also consider that the thicker the coax you use, the less flexible it will be.


For information on choosing the right antenna for your base station set-up, see: https://easycbradio.com/getting-started/buying-guide/
SETTING UP AND GROUNDING YOUR BASE STATION ANTENNA
For a base station set-up you will need to mount an antenna on the roof or on a mast nearby that is the same height or taller than your roof. Your antenna should be away from all solid obstructions 360 degrees around it and above it. CAUTION: you will want to ground outdoor antennas to protect from lightning strikes, and you must avoid all power lines to avoid injury or death from electrocution (see below). Many amateur radio operators unplug the coax from their radios before an electrical storm and place the end of the coax in a glass jar (glass is an excellent electrical insulator) for extra protection.
To ground your antenna you will want to drive an 8 foot, 5/8ths-inch copper or copper-clad steel grounding rod into the ground. [NOTE: Call the dig hotline in your area before doing this, so you don’t hit any utility lines like gas or electricity.] Drive the mast almost all the way into the ground—only leave around 6 to 8 inches sticking out. You will want to wet the ground first and use something like a 2 pound sledge hammer to drive it in. The grounding rod should be around 5 to 6 feet away from your antenna mast (the pole your antenna is mounted on). Connect the a 10 AWG (American Wire Gauge)—or a thicker wire, such 8 AWG wire—non-insulated copper grounding wire to the base of the mast, near the ground, and ensure the grounding wire has a straight (no sharp bends), low-resistance path to the grounding rod. Install a lightning arrestor on the coaxial cable to further protect your equipment. The lightning arrestor should also use at least a 10 AWG copper grounding wire, and it should connect to the same grounding rod your mast is connected to. It is best to connect your grounding rod to your house’s ground as well.
If you cannot set up an antenna outdoors (outdoor antennas are ideal) another option for base station set-ups is to mount an antenna in the attic — but remember that antennas need room, so try to keep all solid obstructions at least 3 feet away. Attic antennas will not need to be grounded. More on base station antennas coming soon!
TUNING YOUR ANTENNA / CHECKING YOUR SWR
Every CB needs to have the standing wave ratio (SWR) checked — this measures the amount of RF signal being reflected back into the CB; too much and it will fry your radio. If you don’t have a built in one on your CB, you can pick up one pretty cheap online or probably at a Radio Shack or truck stop. Below we will explain how to check your SWR using an external SWR meter. (Note: if you are using your CB radio’s internal SWR meter the below info will still be helpful, you will just have to look at your radio’s instruction manual to see how to use the built-in SWR meter.)
- Switch your SWR meter to calibrate (or FWD on some models) mode and depress the transmit button on your microphone to get the needle to the “set” point on your SWR meter.
- Switch to SWR mode (or REF on some models) and key up on channel 1, and write down the reading. Then repeat this on channel 40.
- If your SWR is higher on channel 40 you need to shorten your antenna 1/16 to 1/8 inch at a time (be careful here because it only takes a little to make a difference!). If your SWR is higher on channel 1 you need to lengthen your antenna. (Remember this mnemonic: if your SWR is higher on 40 you need to make it shorty; if your SWR is higher on 1 then you need to lengthen it some.) With a dipole you want to shorten or lengthen equally on both sides. Ideally, you want an SWR of 1.5 or lower, and the same on channel 1 as on channel 40, though this will be difficult to achieve in the real world. Just shoot for the best you can do — see below about high SWRs. (Note: SWR is often expressed as over a 1, so sometimes you’ll see an SWR of 1.5 written as 1.5:1. An SWR of 1 or 1.0:1 means you are transmitting at full power, since none of the power is being reflected back into your radio.)
- Any SWR over 2.0 is considered poor, and over 2.5 is very poor (the danger zone). With an SWR in the 2.0 to 2.4 range you should be alright with occasional or light use of the transmitter, but transmitting with an SWR of 2.5 or higher could damage your radio if you transmit on it a lot. Obviously, the higher the SWR the worse it is on your radio to transmit. Remember, ideally you want your SWR to be 1.5 or lower. You should be able to listen just fine with a high SWR, but don’t transmit much until you’re able to fix it.
Below is a short video on how to do an SWR check and antenna tune in a quick and easy mobile set-up. See our buying guide if you do not have an antenna for your CB radio yet.
Now that you are all set up you will need to know the basics of using your CB radio. Please see the Using Your CB Radio page.
